

Preparation & Room Set-up

Purpose
Workshop 2 builds on what was done in Workshop 1. Participants will share their field insights, adjust areas of focus from Workshop 1, develop focused solutions to increase immunization demand, and begin making their plan operational. By the end of this workshop, you will have an Immunization Demand Strategy focused on the communities with lowest immunization!
ℹ️ REMEMBER: Even though you will leave this workshop with your Immunization Demand Strategy, it’s likely you will need to continue to refine and update it as you seek approval from decision-makers.
In some cases, you may skip or conduct a light version of Workshop 1, IF you feel everyone in your context truly understands the key barriers to immunization for your highest risk communities, and there is no need to discuss these as a group or collect any field data. If you have skipped the earlier phases and are starting here, ensure that before starting Workshop 2:
- You agree with key decision-makers and partners on:
- The priority locations the strategy is focusing on e.g. mountainous regions, conflict areas, or urban slums within your province/subnational region.
- Three to five priority communities found within the priority locations.
- Three to five priority barriers per community that the strategy will focus on.
- Identify any (max 3) health system barriers that the strategy might focus on.
- Fill in Strategy Summary Poster 1 and Strategy Summary Poster 2 with these decisions before starting Workshop 2. If you want to focus on some health system level barriers, fill in the Health System Barriers poster.
- If you did not conduct Field Insights, you will skip Module A and B of Workshop 2 and move straight to Module C: Solve to start generating solutions to the known barriers.
What You’ll Achieve
By the end of Workshop 2, you will:
- Analyse and share insights collected in the field.
- Validate your personas from Workshop 1.
- Adjust the strategy’s areas of focus from Workshop 1.
- Develop new or updated solutions focused on your priority communities.
- Begin thinking about an operational plan for the strategy: Monitoring and evaluation, budgeting, and who will be leading implementation of solutions.
How it Works
You’ll organise and facilitate an in-person workshop with key decision-makers and participants from Workshop 1. The workshop will focus on developing solutions to increase immunization demand and developing a high-level implementation plan.
It’s critical to have key decision-makers and implementing partners as part of Workshop 2 to help support with development of an initial implementation plan, which includes timelines, budget, and indicators. Workshop 2 consists of four modules, with each module informing the next:
- Module A: Adjust Who
- Module B: Adjust Why
- Module C: Solve
- Module D: Implement
By the end of Workshop 2, you will have an Immunization Demand Strategy focused on the needs of prioritized zero-dose or underimmunized communities, preparing you to begin planning implementation.
Tools Needed 🗃️
Online Tools:
Printed Tools:
⚠️ IMPORTANT! Before Workshop 1 begins, you will need to print the below documents to use in the Workshop. Use these printing guidelines to print the below documents.
- Workshop 1 & 2 Header Posters: at the start of each module, put up the header poster for that module. As you go through the modules, place the posters next to each other to show your progress. There are four posters in total for Workshop 2, one for each module.
- You will need to recreate the wall from Workshop 1.
- Workshop 1 & 2 Strategy Posters: the strategy summary posters are critical to both workshops. In the workshop, participants will document decisions about the Immunization Demand Strategy on the posters. At the end of Workshop 2, if you place all of these posters next to each other on the wall, you will be able to see the final strategy.
- Please bring the completed Workshop 1 Strategy Summary Posters to the workshop, so you can continue to develop the work done in Workshop 1.
- Strategy Summary Poster 1
- Strategy Summary Poster 2
- Strategy Summary Poster 3
- Strategy Summary Poster 4
- Strategy Summary Poster: Health System Barriers
- Workshop 2 Table Worksheets: this is where you will be documenting your demand strategy as you move through the modules in each workshop. The result of each module aligns with a section in the demand strategy template. The note-taker should ideally fill this up at the completion of each module. We have included prompts for you to fill this in along the way, so keep adding to it throughout Workshops 1 and 2.
- After Workshop 1, update the strategy template with your team. Keep adding to it during Workshop 2 until the final strategy is ready. Find the template in the online drive.
- Table Worksheet: Persona
- Table Worksheet: Adjust Why
- Worksheet: Impact Indicators
- Table Worksheet: Idea Generation
- Workshop 2 Prompt Cards: Prompt cards are included in Modules C and D of Workshop 2. These cards support teams during activities and discussions, and also spark inspiration by providing relevant examples. Each group will need one set.
Stationery
- Something to stick posters on the wall e.g. Blu Tack or board pins (if your room has a pin board)
- Post-it notes to help capture ideas and move them between posters
- Pens and markers
- Flip charts
- Small stickers to help participants vote on ideas e.g. dot stickers
- Tape
- Stapler
- Spare paper
- Name tags
Daily Agendas 📅
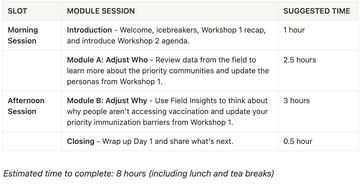
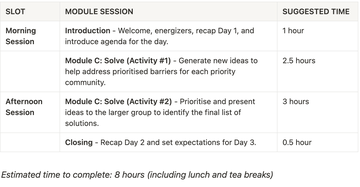
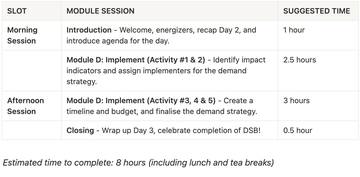
We’ve made it simple to plan your workshops! Below is an example agenda for Workshop 2. The suggested times are only a guide—you can spend more or less time on each part. Plan for about eight hours a day, including lunch and tea breaks. Leave some extra time, just in case.
Day 1: Analyse Field Insights and validate strategy
Day 2: Ideate, refine, and prioritise solutions to address key barriers
Day 3: Create a high-level implementation plan
Average Rating: ☆ ☆ ☆ ☆ ☆ (0 reviews)