

Room Set-up
⚠️ Setting up the workshop room is critical—DO NOT SKIP THIS!
Before the workshop:
- Finalise your facilitation team
- If possible, use the same facilitators from Workshop 1. You will need one to two lead facilitators to guide the participants through the workshop, and to enable open group discussions and decision-making. The lead facilitators will need to lead activities from the front of the room and hand out posters/worksheets.
- If possible, it’s also recommended to have other co-facilitators who sit at each table and support groups directly (table facilitators).
- If you have table facilitators supporting you, ensure you run them through activities in advance so they know what to expect and how to support their tables through activities.
- If the workshop participants speak multiple languages, it’s best if you can use table facilitators who speak the local languages. This is particularly important for community members or local healthcare workers attending the workshop who may not be familiar with the facilitation language.
- Look out for the highlighted facilitation tips for extra guidance on how your co-facilitators or table facilitators should prompt participants during exercises. Ensure you prepare your co-facilitators on what to do and say!
- Prepare the Workshop 2 materials
- On the day of the workshop, arrive early to set up a welcoming and organised environment. Position the registration area near the entrance with name tags and forms, and create a refreshments table with water, snacks, and essentials to keep participants energised.
- Review the Workshop 2 Facilitator’s Guide so you are familiar with the workshop activities and steps.
- Print the Workshop 2 Tools (see above) and prepare them and your stationery based on the estimated number of participants. Bring extra, in case more people arrive!
- Review your work from Workshop 1 and Field Insights to remember key decisions made. Remind the participants to do the same, and to carry their field notes with them.
- You will need to bring the following materials from Workshop 1 into this workshop:
- The completed Table Worksheet: Persona from Workshop 1, Module B. You will need to give each group the original persona worksheet they filled out in Workshop 1, so they can see their previous work.
- The completed Strategy Summary Posters 1 and 2 from Workshop 1, Modules A and D. From Workshop 1, you should have filled in one copy of the Strategy Summary Poster 1, then each group should have their own community’s Strategy Summary Poster 2.
- If you identified health system barriers in Workshop 1, then you will need to bring the completed Strategy Summary Poster: Health System Barriers.
- Plan the tables/working groups for the workshop
- Review the number of participants confirmed to attend. Ideally, most participants will be the same as Workshop 1, but it’s better to be flexible and prepare as if some have dropped out or new participants have joined.
- Arrange tables in clusters for easy group work, with each table seating four to six participants. Participants will be distributed across groups in the following manner:
- Workshop 1 participants: These people will continue to work in the community groups that they worked in for Workshop 1. Plan the tables based on these community groups.
- New participants: In case new participants join Workshop 2, distribute them into the priority community or groups where they have the most knowledge or working experience, e.g. a healthcare worker working within a particular community should be assigned to that group.
- Health system barriers group: At the end of Workshop 1, Module D, you may have identified some health system barriers, e.g. lack of healthcare resources in hospitals, or complicated healthcare data management systems or limited policies and governance around healthcare. **You should have documented them on Strategy Summary Poster: Health System Barriers. If you did not, ensure you print and document these on the poster to bring to Workshop 2.
- If health system barriers have been identified in Workshop 1: Before the start of Module B: Solve, identify four to five participants from the whole workshop participant list to join a new health system barrier group. Ensure that these participants are involved in decision-making that influences the manner in which systems are structured—for example, national or provincial level government staff or decision-makers. Instead of focusing on a priority community group in Workshop 2, these participants will focus on the health system barriers. At the start of Module B: Adjust Why, you will move these participants into a separate group. Before this, they should be part of the main group.
- If health system barriers have not been identified in Workshop 1: Consider asking key decision-makers and local government staff whether this is something that should be included in Workshop 2. If you identify the key health system barriers, a new group can be formed to focus on these barriers using the guidance in the bullet point above. If you do not want to prioritise any health system barriers, then continue Workshop 2 with only groups focused on the priority communities.
- Confirm the invite and participant list for Workshop 2, Day 3: Implement
- Key decision-makers will be essential for Day 3 to support the development of an actionable plan. This will depend on your context, but will most likely include local government, implementing partners (UNICEF and WHO), and other local partners and decision-makers such as CSOs, NGOs, religious leaders and women’s and men’s groups. You should have identified these key decision-makers in Initial Insights, Module B.
On the day before the workshop: Set up the room
Step 1: Room set-up before the workshop
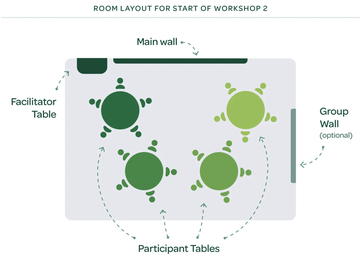
Main wall: the main wall is any central wall in the room that all participants can see. Recreate the main wall from Workshop 1 to remind participants of the key decisions from Workshop 1. Place the following Workshop 1 posters on the wall (either the original posters, or rewrite them on new printed posters):
- Header Posters: Workshop 1, Modules A-E
- Completed Strategy Summary Posters 1 and 2 to show key decisions made in Workshop 1
- If you identified health system barriers in Workshop 1, add the completed Strategy Summary Poster: Health System Barriers on the wall.
- Place four large flip chart papers on the wall with the following reflection prompts:
- What did you learn in the field?
- What surprised you in the field?
- Did you confirm anything you thought you knew in Workshop 1?
- What made you sad? What gave you hope?
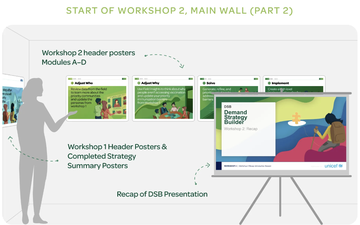
Use photos from Workshop 1 to guide the set-up. Arrange posters so participants can easily read and add input. Keep Workshop 1 posters on one side of the wall, leaving enough space for Workshop 2 materials.
- Set up materials to introduce Workshop 2 on the main wall.
- Set up a projector to present the Recap of the DSB Presentation.
- Place all Workshop 2 header posters in sequence on the wall, e.g. from Module A to Module D.
Participant tables: participants will be divided into groups during the workshop. Ensure each group’s table has:
- Post-it notes to capture and move ideas between posters
- Pens and markers
- Small stickers (e.g. dot stickers) for voting on ideas
- Tape and scissors
- A4 size spare paper
Group walls (optional):
If possible, assign some wall space for each group to put up their Table worksheets during the workshop. If you have space for this, add each groups’ Strategy Summary Poster 2, and Table Worksheet: Persona from Workshop 1, otherwise put it on their tables. If you have identified a new health system barriers group, create a wall space for them.
Facilitator table: have a table on the side to store all Workshop 2 Strategy Summary Posters, Table Worksheets, and Prompt Cards organised by module so they are ready to be used at the right time.
Step 2: During the workshop
Through each module, your room should look like this:
- Introduction and Recap
- At the start of the module:
- The Header Posters and Strategy Summary Posters 1 and 2 from Workshop 1 are displayed on the main wall (see above diagram “Start of Workshop 1, Main Wall (Part 1)”).
- If you identified health system barriers in Workshop 1, add the Strategy Summary Poster: Health System Barriers on the main wall.
- The Recap of the DSB presentation is ready to be presented.
- Remember: Ensure you fill out the presentation before the workshop, adding the key decisions made in Workshop 1.
- If you are unable to present, you will need to use header posters from Workshop 1 and 2 to remind participants of the DSB process, and the strategy summary posters to present the key decisions made.
- The Header Posters and Strategy Summary Posters 1 and 2 from Workshop 1 are displayed on the main wall (see above diagram “Start of Workshop 1, Main Wall (Part 1)”).
- At the start of the module:
- Module A: Adjust Who
- At the start of the module:
- The Strategy Summary Poster 1 from Workshop 1 is displayed on the main wall, aligned with the Workshop 1, Module A Header Poster (see above diagram “Start of Workshop 1, Main Wall (Part 1)”).
- During the module:
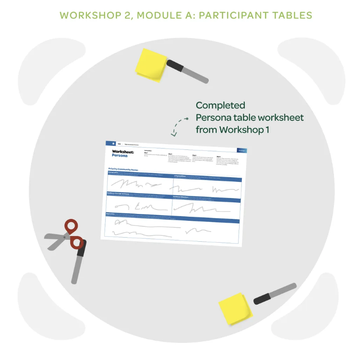
- Give each table their relevant original Table Worksheet: Persona from Workshop 1.
- At the start of the module:
- Module B: Adjust Why
- At the start of the module:
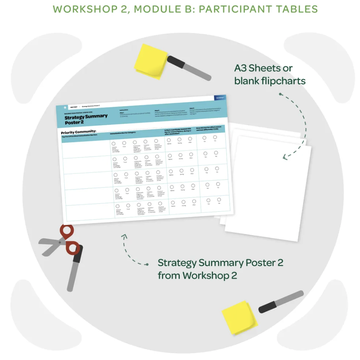
- Remove the Strategy Summary Poster 2 from the main wall and distribute the relevant Strategy Summary Poster 2 from Workshop 1 to each table.
- [If you identified health system barriers in Workshop 1] Remove the Strategy Summary Poster: Health System Barriers from the main wall, and place it on a new group/table which will focus on system level barriers.
- Distribute blank flip charts or A3 sheets to each table.
- During the module:
- Give 1 x Table Worksheet: Adjust Why to each table.
- At the start of the module:
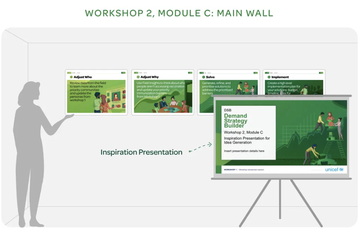
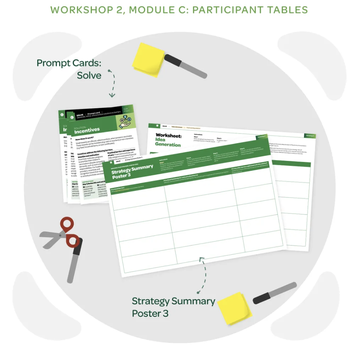
- Module C: Solve
- At the start of the module:
- The Solve Inspiration Presentation is ready to be presented. In case it can’t be projected, distribute one copy of the presentation to each participant.
- Give one set of Prompt Cards: Solve is to each table.
- Give one Table Worksheet: Idea Generation to each table.
- At the start of the module:

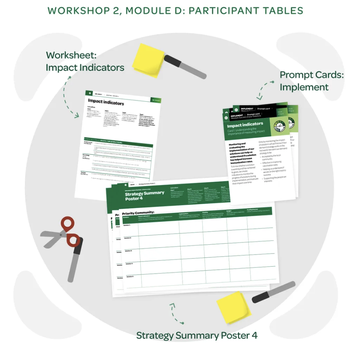
- Module D: Implement
- At the start of the module:
- Give one set of Prompt Cards: Implement to each table.
- Give one Worksheet: Impact Indicators to each table.
- Give three copies of the Strategy Summary Poster 4 to each table.
- At the start of the module:
Step 3: After the workshop
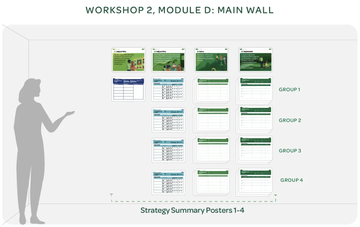
Main wall:
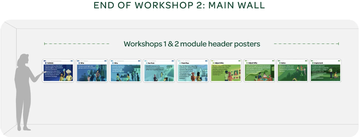
- Header posters for Workshop 1 and Workshop 2 are displayed sequentially.
- Strategy Summary Posters 1 to 4 are placed next to each other to show each group’s community strategy. You will have only one copy of Strategy Summary Poster 1, but then each group will have their own posters 2, 3, and 4. Different community group posters can be placed on top of each other.
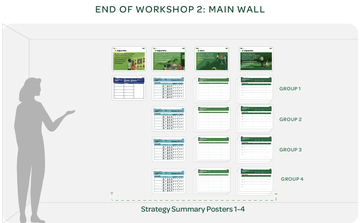
ℹ️ Remember to take a photograph of all posters and worksheets before finishing the workshop!
Let’s make Workshop 2 inspiring, interactive, and fun! 🚀
Average Rating: ☆ ☆ ☆ ☆ ☆ (0 reviews)