

Preparation & Setup
Welcome to Workshop 1!
Now you’re ready to bring people together to build the strategy! This is the second phase of the Demand Strategy Builder process, and it’s a moment to agree on the key immunization problems the strategy will focus on. Workshop 1 usually takes two days, but the time may vary based on your preparation during Initial Insights.

Purpose
In this workshop, you’ll bring together key people such as local government immunization staff, local NGOs, healthcare workers, and community leaders to define the focus of your Immunization Demand Strategy.
What You’ll Achieve
By the end of Workshop 1, you will:
- Confirm the priority locations and communities the strategy will focus on.
- Finalise your strategy’s immunization objective.
- Identify the main reasons or barriers why the priority communities have low immunization or don’t vaccinate (zero-dose).
- Create a plan to collect additional qualitative data about your priority communities.

How it Works
You’ll organise and facilitate an in-person workshop with the decision-makers and workshop participants identified in Initial Insights (Module C). Workshop 1 has five modules that should be completed in order, as part of one workshop:
- Module A: Validate
- Module B: Who
- Module C: Why
- Module D: Her First
- Module E: Field Plan
By the end of Workshop 1, participants will be ready to visit communities and gather data. After that, they’ll move to Workshop 2 to review the data and find solutions to the barriers.
To help you have a successful workshop, read the Workshop 1 facilitator’s guide before the workshop so you have everything printed and prepared!
🗃️ Tools Needed
(Ensure you print the relevant tools here, before Workshop 1 starts)
Online Tools
- Data Presentation
- The Facilitator’s Guide: This is what you are reading right now!
- The Demand Strategy Template
Printed Tools
⚠️ IMPORTANT! Before Workshop 1 begins, you will need to print the below documents to use in the Workshop. Use these printing guidelines to print the below documents.
- Workshop 1 Header Posters: at the start of each module, stick the relevant Header Poster on the wall. Place the posters side by side to track progress. Workshop 1 has five posters, one for each module, so at the end you will have five posters.
- Workshop 1 Strategy Posters: this is where you will be documenting your demand strategy as you move through the modules in each workshop. The output of each module aligns with a section in the demand strategy template. The note-taker should ideally fill this up at the completion of each module. We have included prompts for you to fill this in along the way, so keep adding to it through Workshops 1 and 2.
- Workshop 1 Table Worksheets: this is where you will be documenting your demand strategy as you move through the modules in each workshop. The output of each module aligns with a section in the demand strategy template. The note-taker should ideally fill this up at the completion of each module. We have included prompts for you to fill this in along the way, so keep adding to it through Workshops 1 and 2.
- After Workshop 1, update the strategy template with your team. Keep adding to it during Workshop 2 until the final strategy is ready. Find the template in the online drive.

📅 Daily Agendas
Day 1: Confirm your problem and priority communities, and map barriers
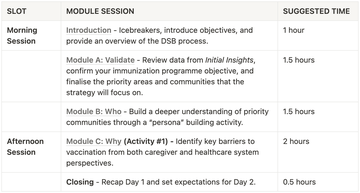
Estimated time to complete: 8 hours (including lunch and tea breaks)
Day 2: Identify gender-specific barriers and prepare for the field
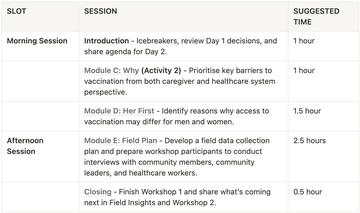
Estimated time to complete: 8 hours (including lunch and tea breaks).
Average Rating: ☆ ☆ ☆ ☆ ☆ (0 reviews)